GraphQL Mutations
It’d be great to start by writing some queries to explore the graph of the app, like you did in the sketches exploring graph ideas, but there’s no data yet, so queries won’t be much use. So instead, you’ll start by adding data.
Add a User
GraphQL mutations have the useful property of returning a result. That result can help your UI, for example, to re-render a page without further queries. Dgraph Cloud lets the result returned from a mutation be as expressive as any graph traversal.
Let’s start by adding a single test user. The user type has the following fields:
username, displayName, avatarImg, posts and comments, as shown below:
type User {
  username: String! @id
  displayName: String
  avatarImg: String
  posts: [Post!]
  comments: [Comment!]
}
In this example, the only required field (marked with !) is the username.
So, to generate a new user node in the graph, we only need to supply a username.
The sample app’s GraphQL API includes an addUser mutation, which can be used
to add multiple users and their data in a single operation. You can add one user
and their username with the following mutation:
mutation {
  addUser(input: [
    { username: "User1" }
  ]) {
    user {
      username
      displayName
    }
  }
}
The mutation keyword tells a GraphQL server that it’s running a mutation. The
mutation (in this case, addUser) takes the provided arguments and adds that
data to the graph.
The mutation shown above adds a single user, User1, and returns the newly
created user’s username and displayName. The displayName will be null
because you didn’t provide that data. This user also has no posts or
avatarImg, but we aren’t asking for those in the result. Here’s how it looks
when run in the Dgraph Cloud API Explorer.
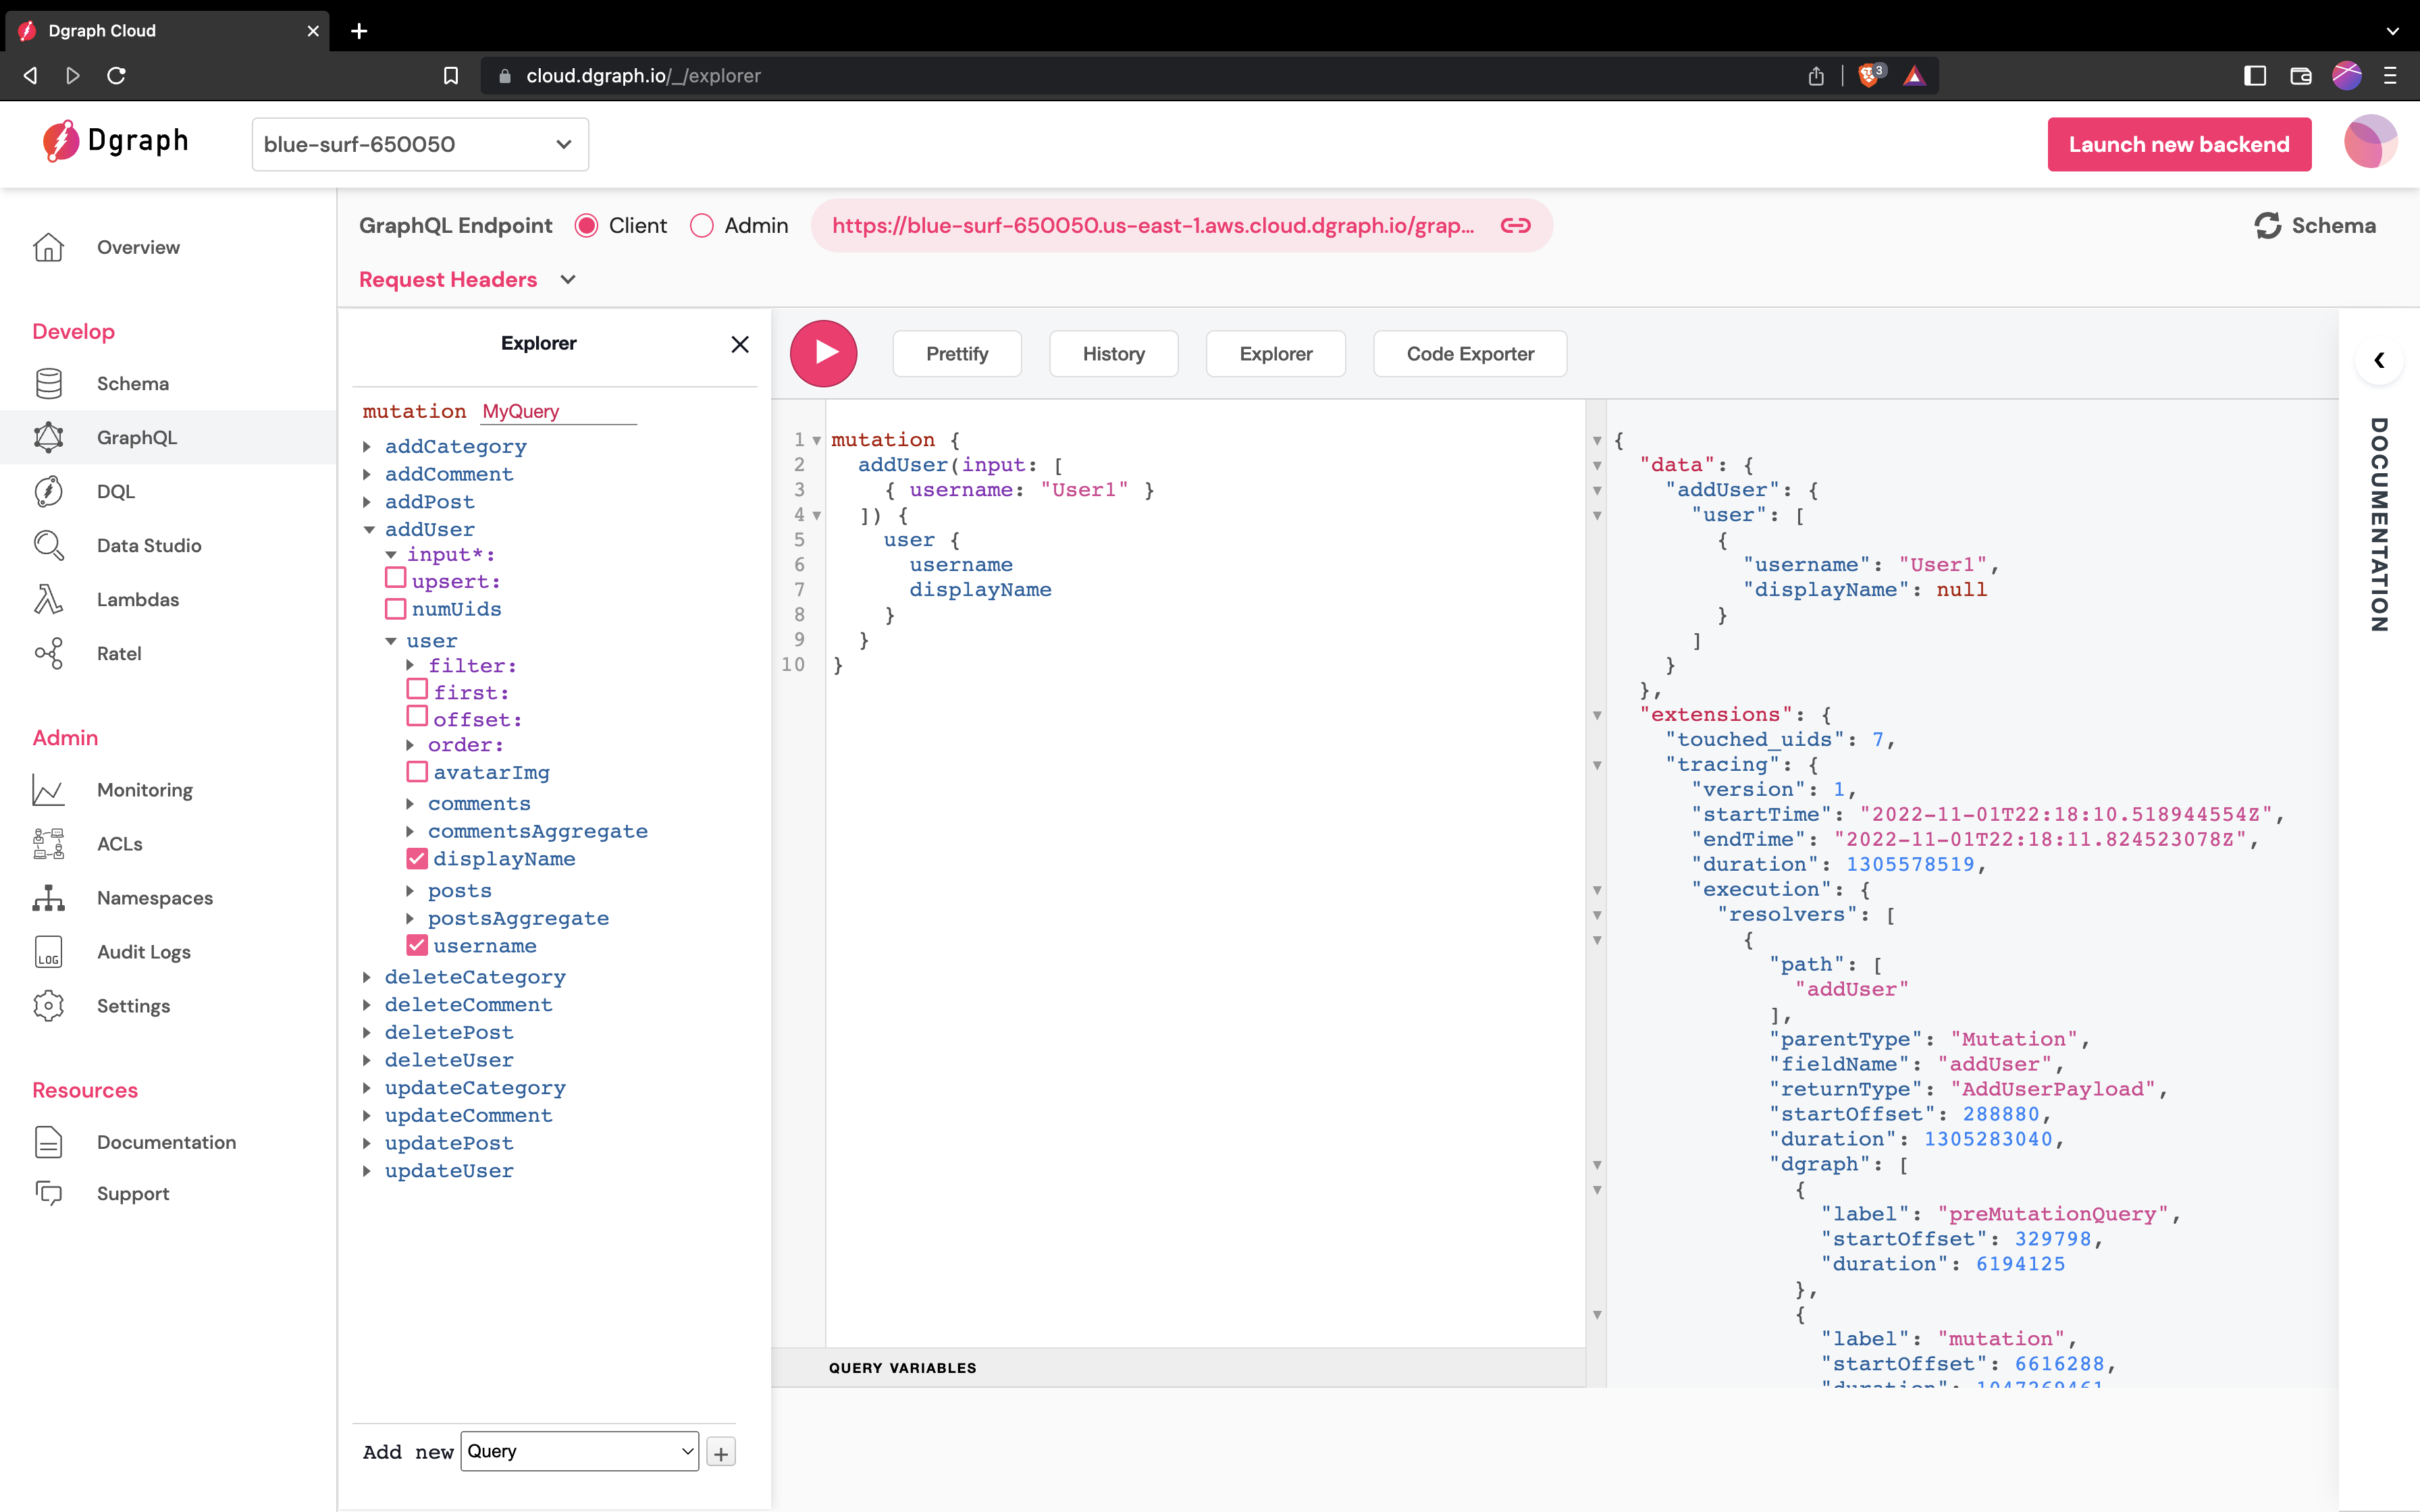
run a mutation in Dgraph Cloud
Add a category
The graph now has a single node. Next, you’ll add a category using the
addCategory mutation. Categories are a little different than users because the
id is auto-generated by Dgraph Cloud. The following mutation creates the
category and returns its name and the id Dgraph Cloud gave it.
mutation {
  addCategory(input: [
    { name: "Category1" }
  ]) {
    category {
      id
      name
    }
  }
}
When run in Dgraph Cloud’s API Explorer, the mutation looks as shown below.
Note that the category’s id is auto generated and will be different on any
execution of the mutation.
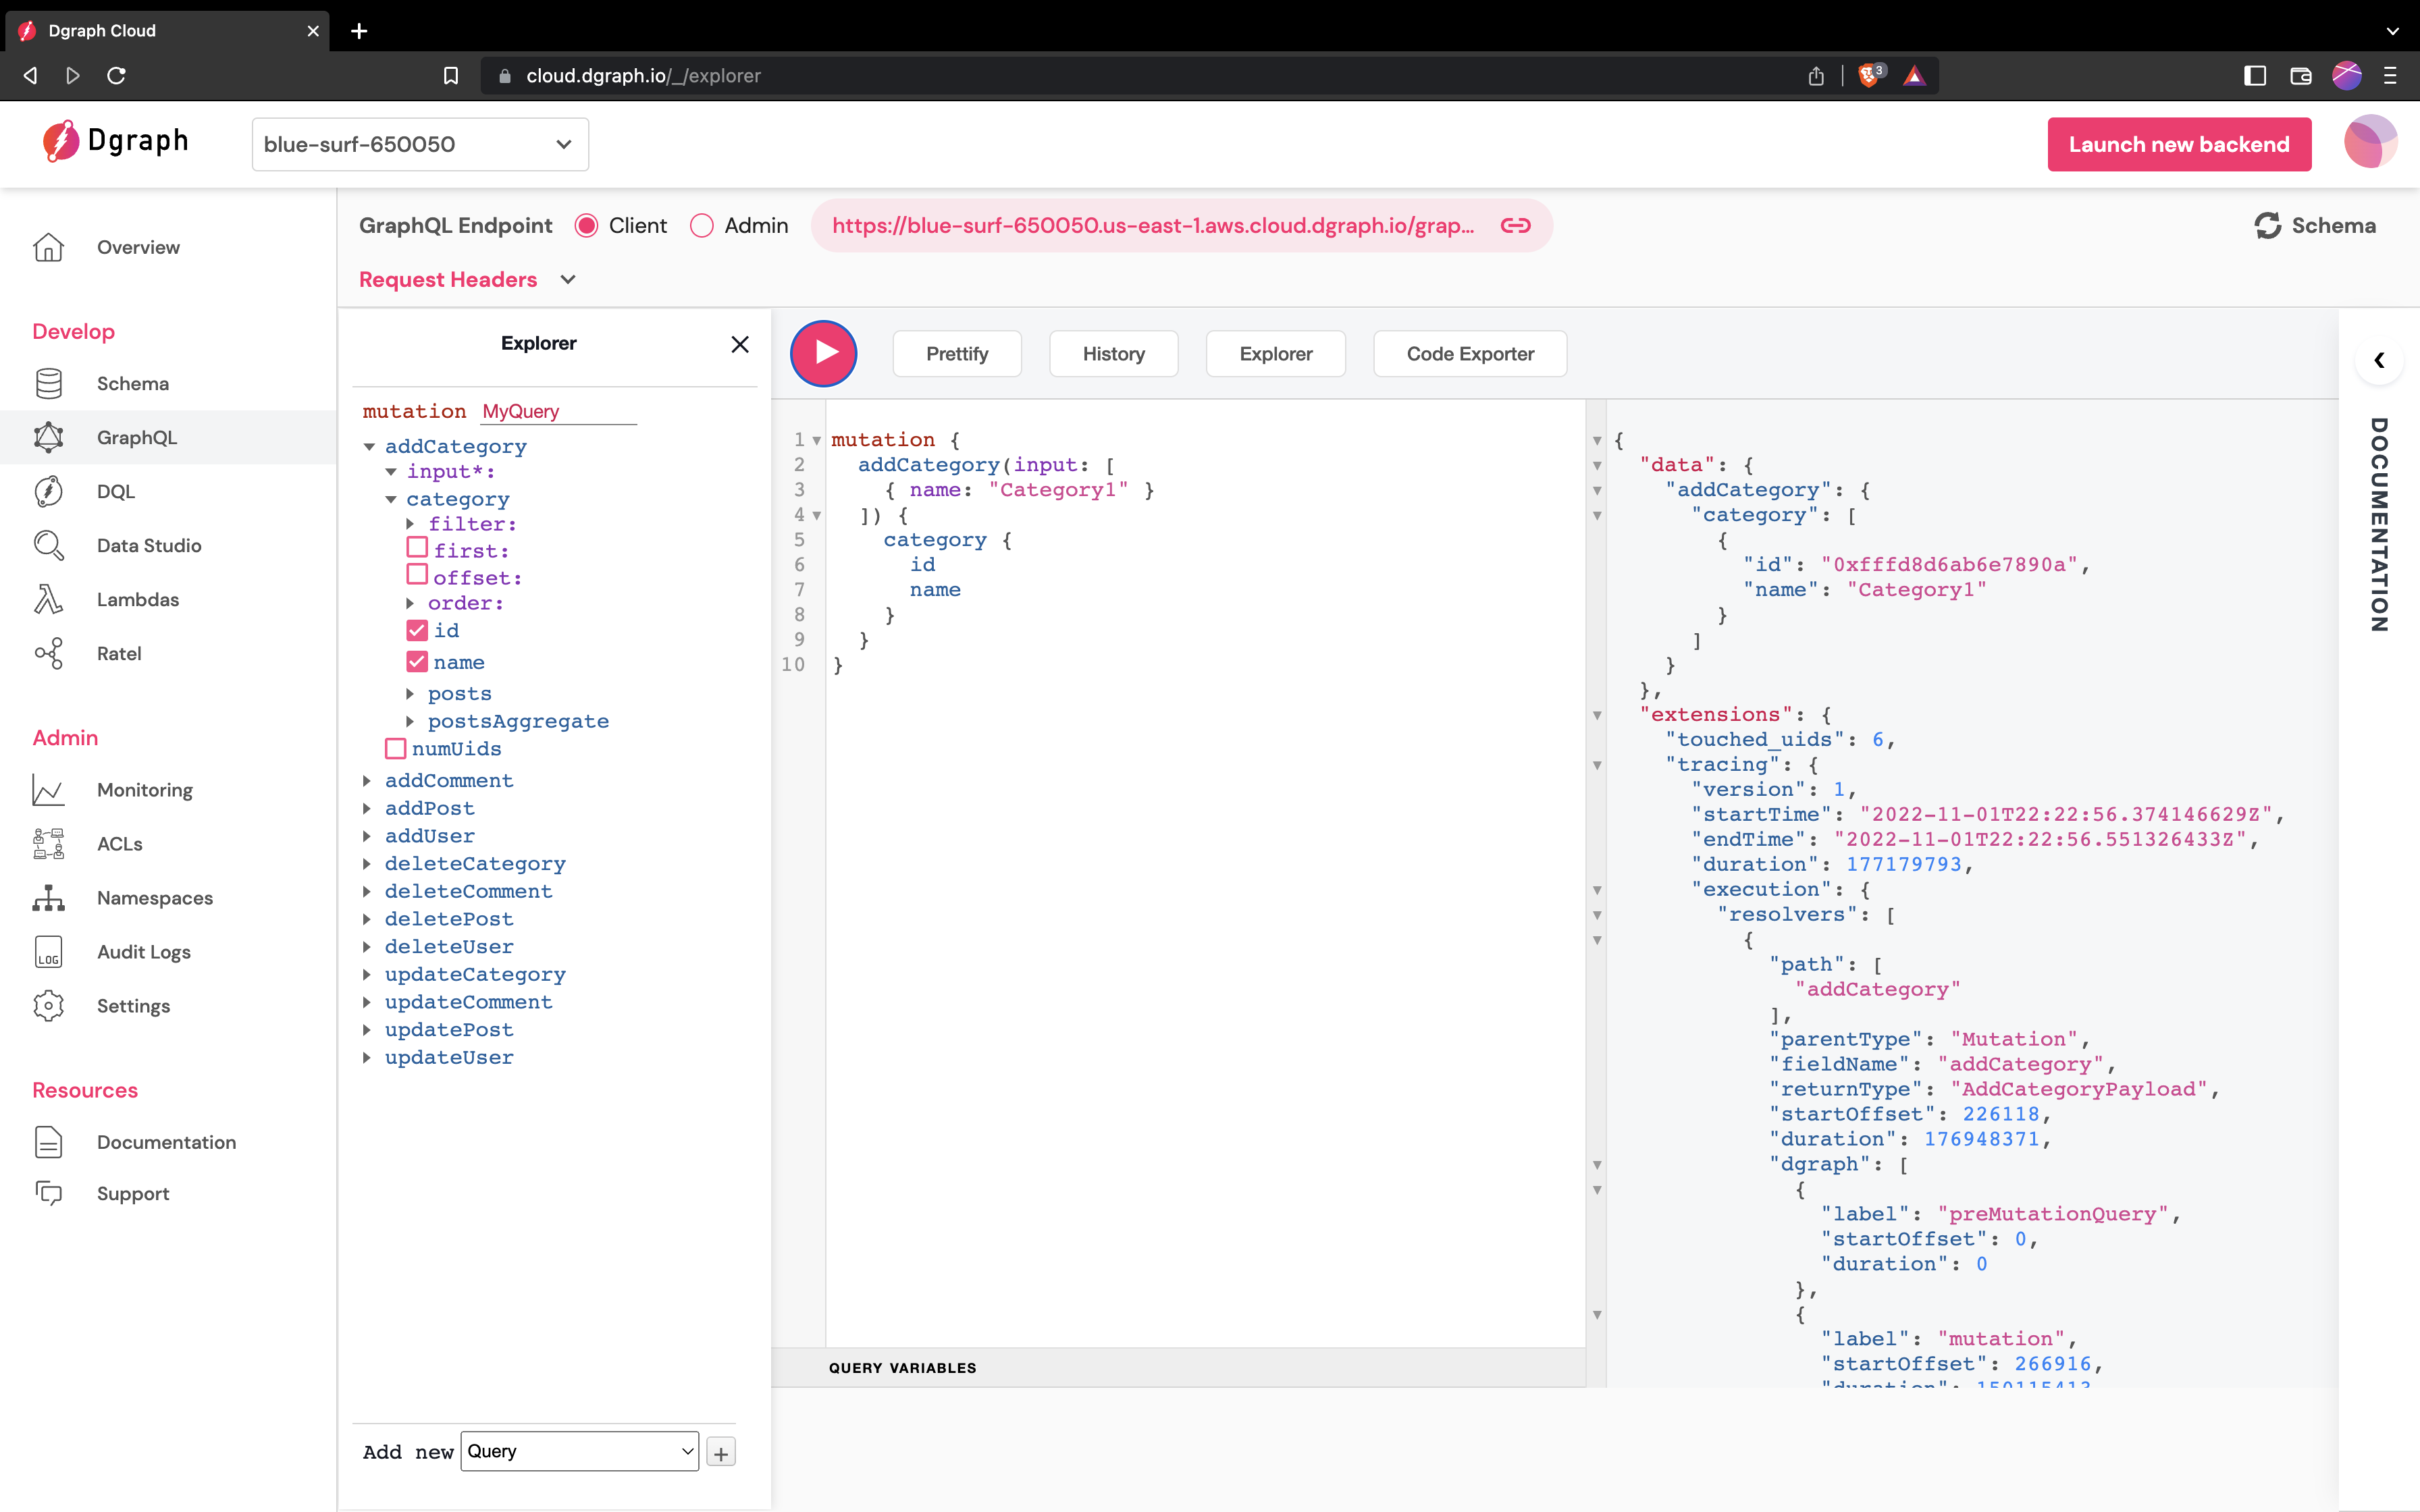
run a mutation with auto generated id in Dgraph Cloud
Add Some Posts
Dgraph Cloud can do more than add single graph nodes at a time. The mutations can add whole subgraphs and link into the existing graph. To show this, let’s do a few things at once. Remember our first sketch of some graph data?
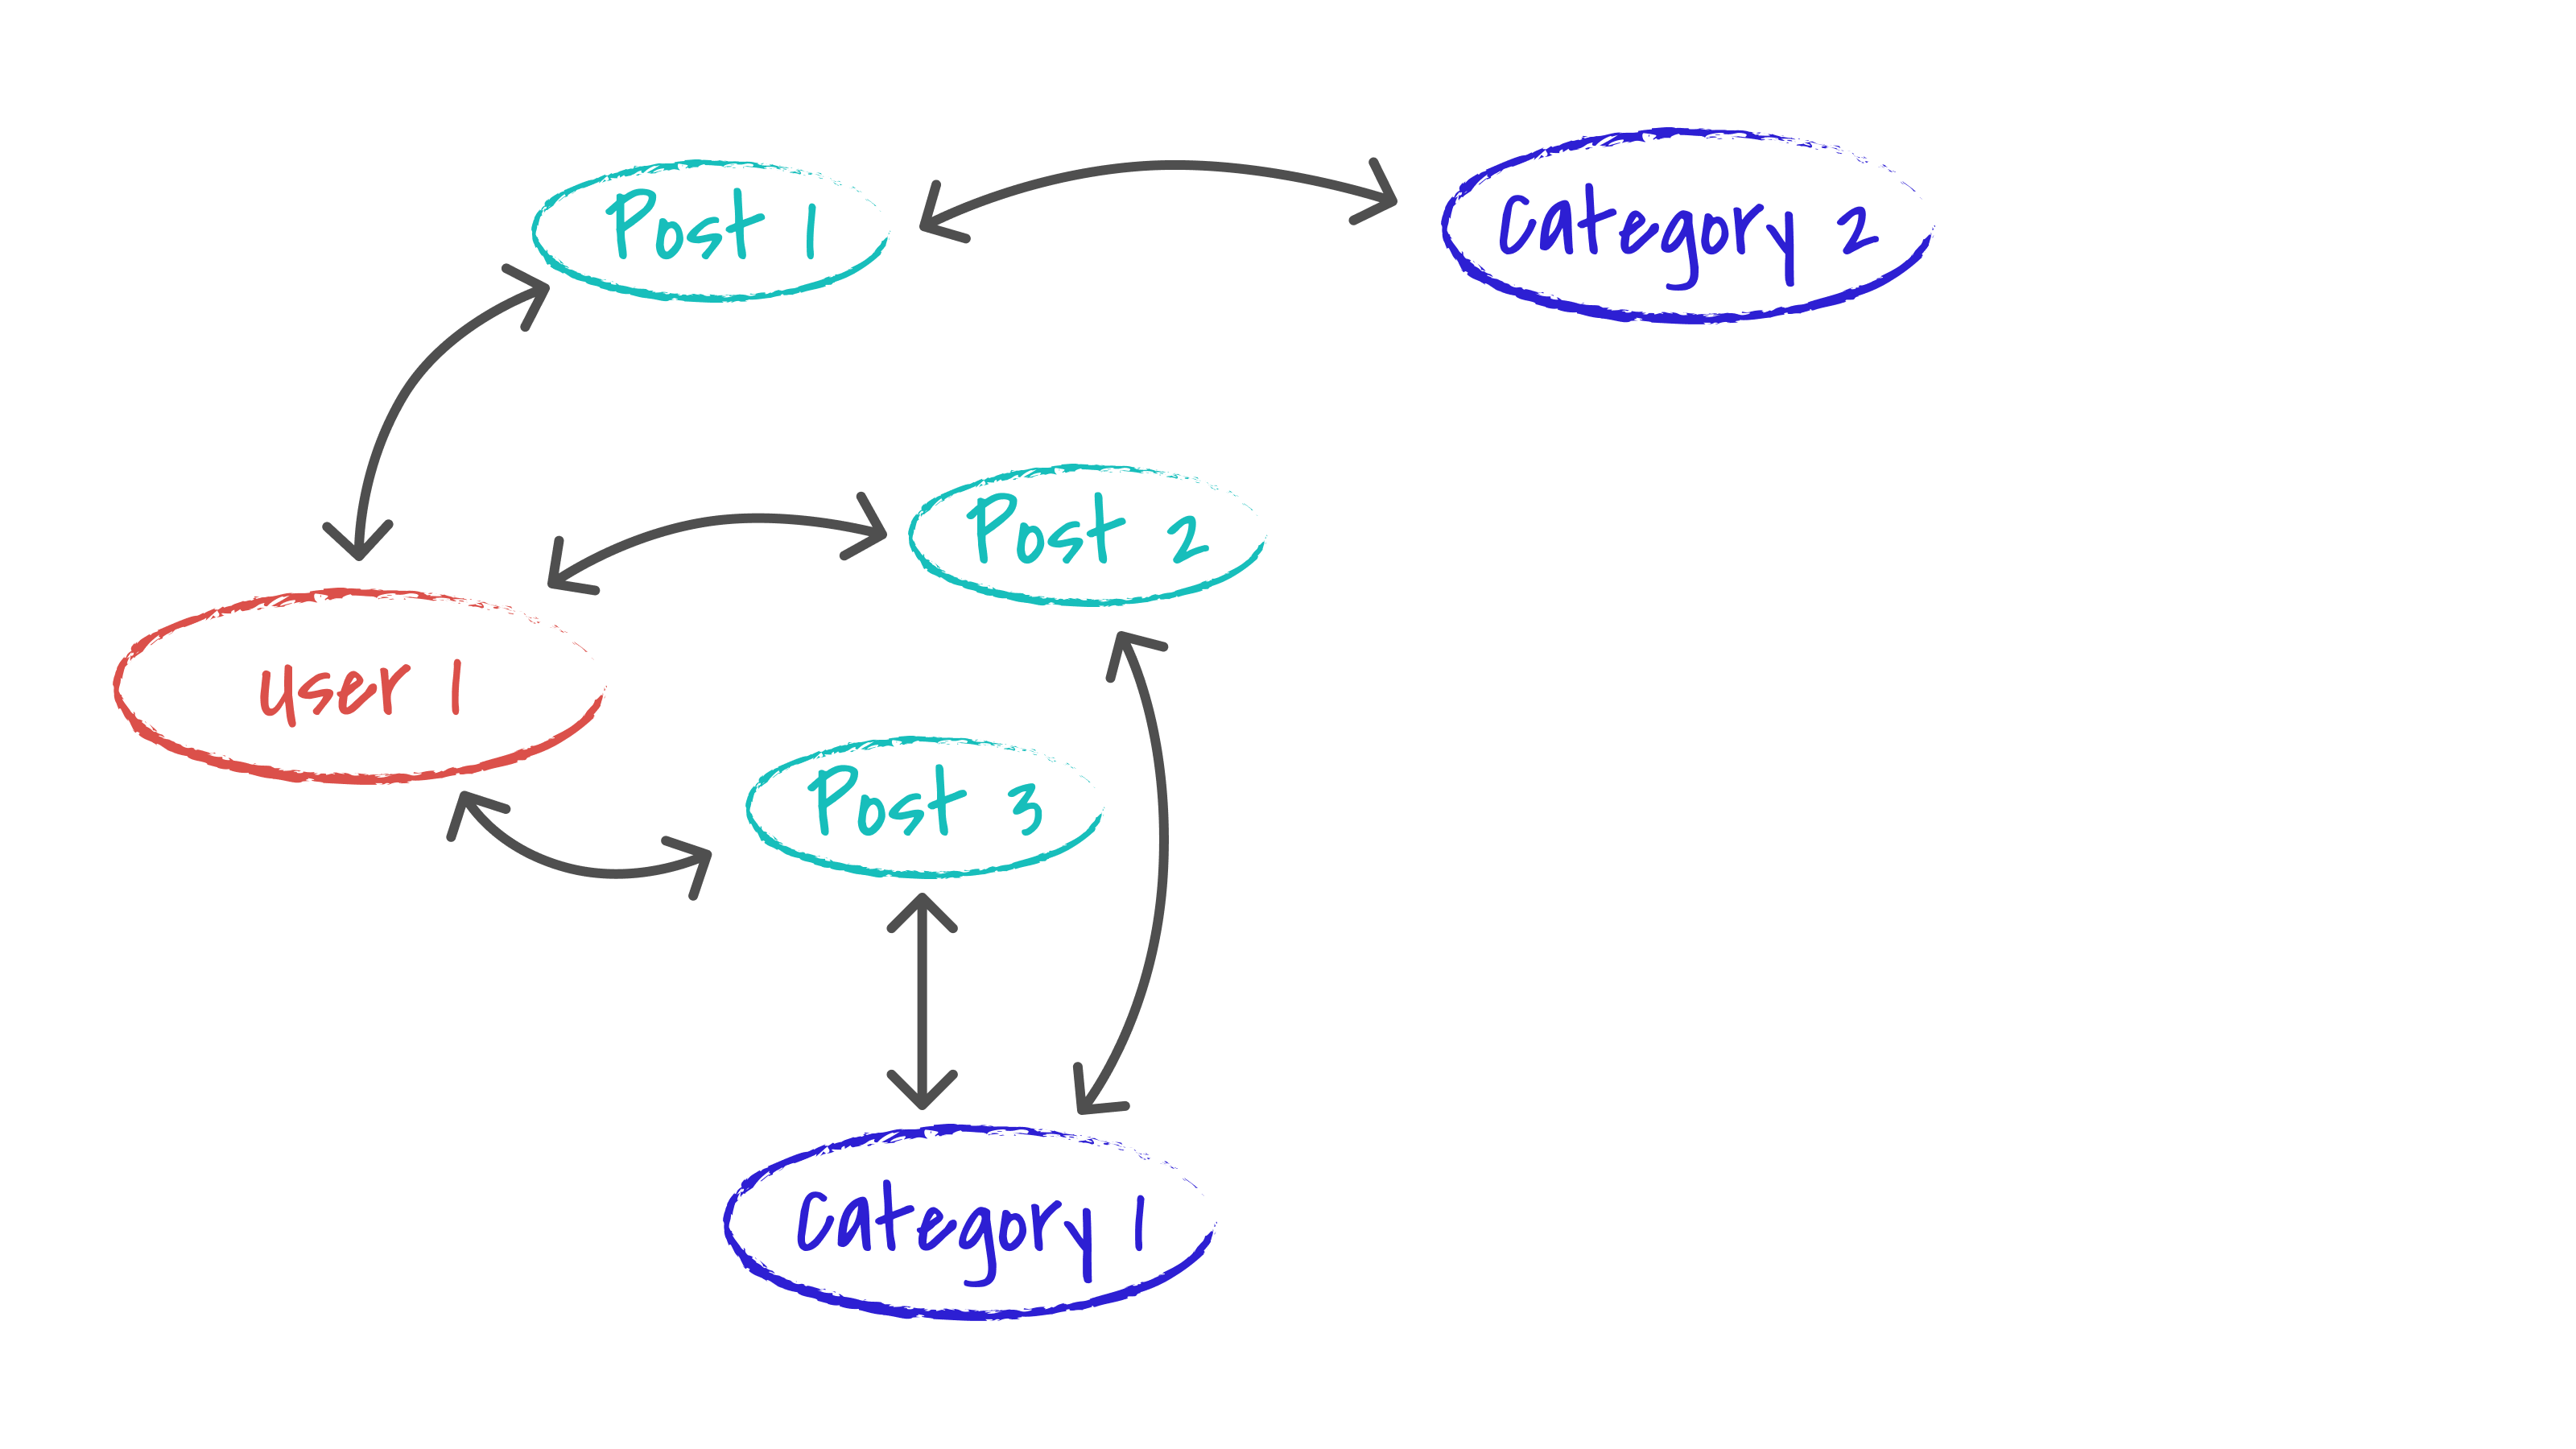
sub graph with first posts
At the moment we only have the User1 and Category1 nodes. It’s not much of
a graph, so let’s flesh out the rest of the graph in a single mutation. We’ll
use the addPost mutation to add the three posts, link all the posts to User1, link posts 2 and 3 to the existing category, and then create Category2. And, you’ll do all of this in a single operation using the following mutation:
mutation {
  addPost(input: [
    {
      title: "Post1",
      text: "Post1",
      author: { username: "User1" },
      category: {
        name: "Category2"
      }
    },
    {
      title: "Post2",
      text: "Post2",
      author: { username: "User1" },
      category: { id: "0xfffd8d6ab6e7890a" }
    },
    {
      title: "Post3",
      text: "Post3",
      author: { username: "User1" },
      category: { id: "0xfffd8d6ab6e7890a" }
    }
  ]) {
    post {
      id
      title
      author {
        username
      }
      category {
        name
      }
    }
  }
}
Because categories are referenced by an auto-generated ID, when you run such a mutation, you’ll need to make sure that you use the right id value for Category1 — in my run that was 0xfffd8d6ab6e7890a, but yours might differ. In the Dgraph Cloud API explorer, that mutation looked like this:
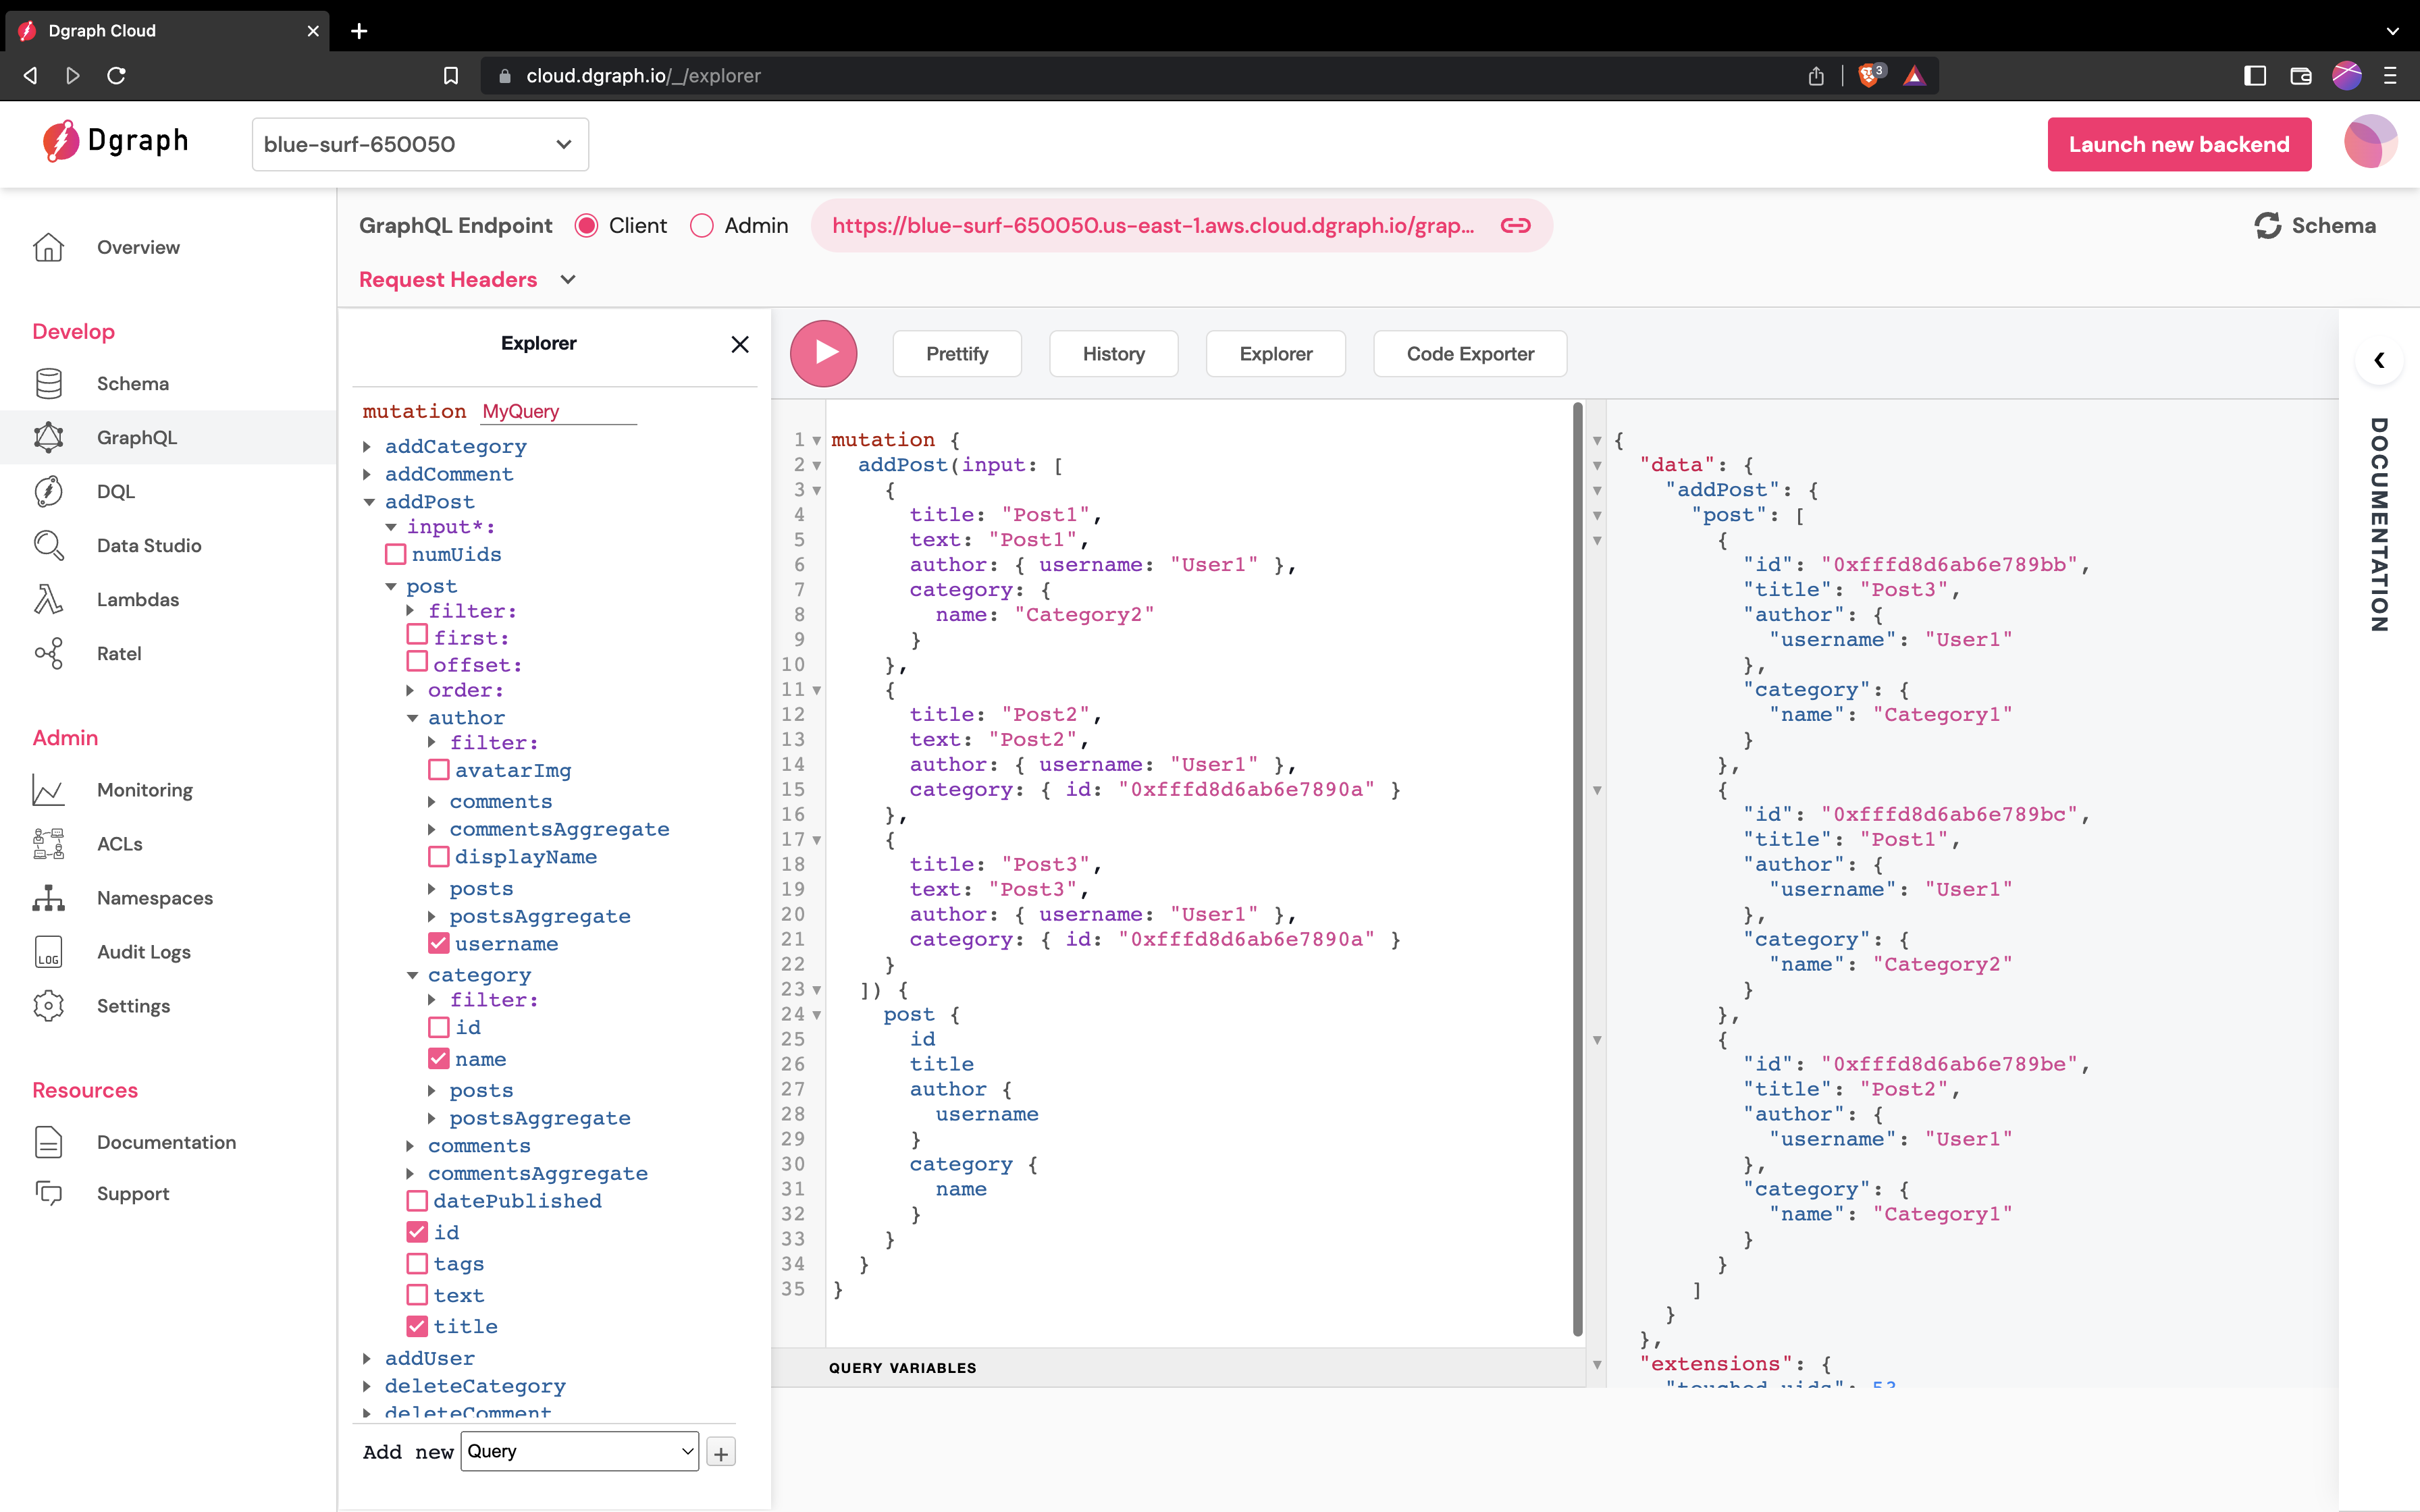
A real app probably wouldn’t add multiple posts in that way, but this example shows the what you can do with mutations in Dgraph Cloud. For example, you could create a shopping cart and add the first items to that cart in a single mutation.
The input format to Dgraph Cloud also shows you another important property that helps you when you are building an app: serialization of data. In general, you can serialize your data structures, send them to Dgraph Cloud and it mutates the graph. So, you don’t need to programmatically add single objects from the client or work out which bits are in the graph and which aren’t — just serialize the data and Dgraph Cloud works it out. Dgraph Cloud uses the id’s in the data to work out how to connect the new data into the existing graph.
Add sample data
You can run some more mutations, add more users or posts, or add comments to the posts. To get you started, here’s a mutation that adds some more data that we can use to explore GraphQL queries in the following section.
mutation {
  addPost(input: [
    {
      title: "A Post about Dgraph Cloud",
      text: "Develop a GraphQL app",
      author: { username: "User1" },
      category: { id: "0xfffd8d6ab6e7890a" }
    },
    {
      title: "A Post about Dgraph",
      text: "It's a GraphQL database",
      author: { username: "User1" },
      category: { id: "0xfffd8d6ab6e7890a" }
    },
    {
      title: "A Post about GraphQL",
      text: "Nice technology for an app",
      author: { username: "User1" },
      category: { id: "0xfffd8d6ab6e7890a" }
    },
  ]) {
    post {
      id
      title
    }
  }
}
GraphQL Variables
A mutation that takes data in its arguments is great to try out in a UI tool, but an app needs to connect the data in its internal data structures to the API without building complex query strings. GraphQL Query Variables let a query or mutation depend on input values that are resolved at run-time.
For example, the following addOnePost mutation requires an input $post
(of type post) that it then passes as the input argument to the addPost
mutation:
mutation addOnePost($post: AddPostInput!) {
  addPost(input: [$post]) {
    post {
      id
      title
      text
    }
  }
}
Running this mutation requires a packet of JSON that supplies a value for the needed variable, as follows:
{
  "post": {
      "title": "GraphQL Variables",
      "text": "This post uses variables to input data",
      "author": { "username": "User1" },
      "category": { "id": "0xfffd8d6ab6e7890a" }
    }
}
In Dgraph Cloud’s UI, there’s a Query Variables tab that you can use to enter the variables.
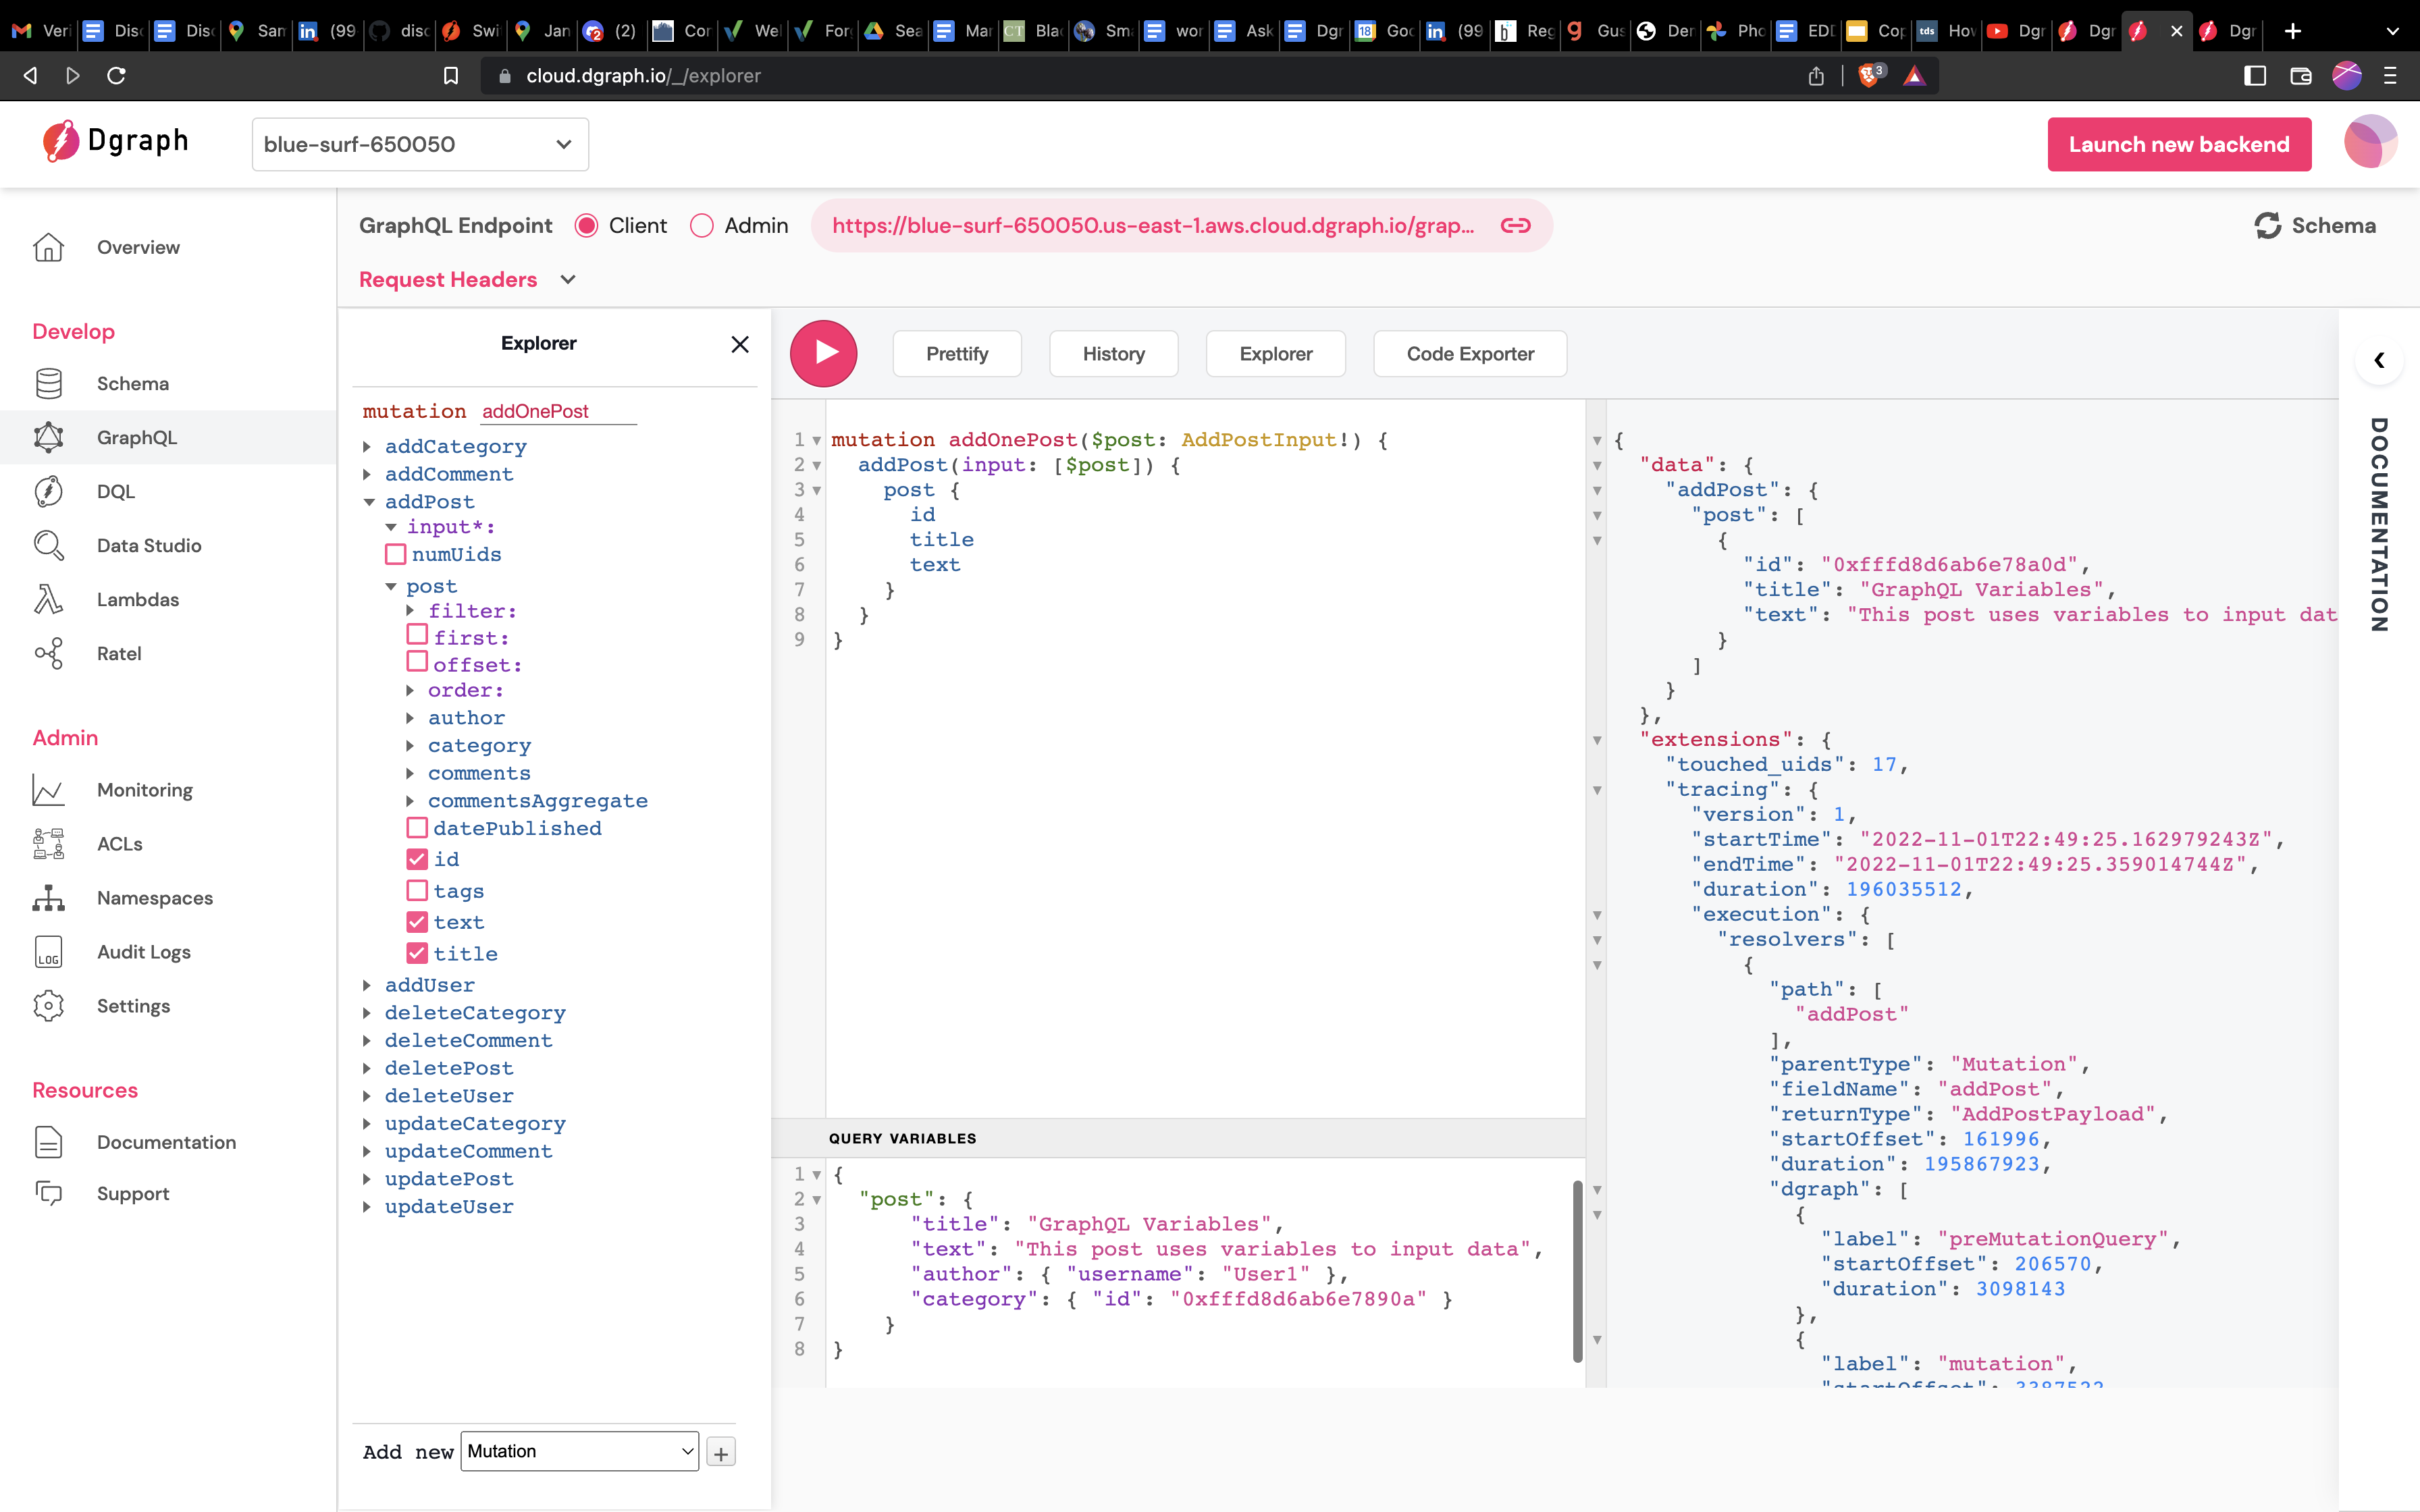
Mutation with GraphQL Variables
GraphQL variables let an app depend on a fixed mutation string and simply inject the actual data into the mutation when it’s executed, meaning same mutation can be used over and over with different data.
Mutations used in the App
The app always uses GraphQL variables so that there’s a small set of mutations and the data can be supplied by serializing client-side data structures.
The app will need a mutation to add users:
mutation($username: String!) {
  addUser(input: [{ username: $username }]) {
    user {
      username
    }
  }
}
It will also need a mutation to add posts:
mutation addPost($post: AddPostInput!) {
  addPost(input: [$post]) {
    post {
      id
      # ... and other post data
    }
  }
}
It will need a mutation to add comments:
mutation addComment($comment: AddCommentInput!) {
  addComment(input: [$comment]) {
    comment {
      id
      # ... and other comment data
    }
  }
}
And finally, it will need a mutation to update posts:
mutation updatePost($id: ID!, $post: PostPatch) {
  updatePost(input: {
    filter: { id: [$id] },
    set: $post }
  ) {
    post {
      id
      # ... and other post data
    }
  }
}
The updatePost mutation combines a search and mutation into one. The mutation
first finds the posts to update (the filter) and then sets new values for the
post’s fields with the set argument. To learn how the filter works, let’s
look at how Dgraph Cloud handles queries.